Sunday, May 29, 2011
One a Day in May - Day 29 - When to say when!
I just have to call an early end to my May challenge because I'm not super human after all. I am working on clearing out 20 years of stored junk for a yard sale next weekend and there are no minutes to spare so I'm going to forgive myself and move on. But I will be back!
Saturday, May 28, 2011
One a Day in May - Day 28 - We all fall down!
Okay, it had to happen. I just can't do a single thing tonight. I've been going since 5:30 this morning and it's now 10:30 pm and something has to give. I guess I could consider this blog post my creative bit for the day. A bit of a stretch, I know.
 We've had endless rain and/or snow this past couple of weeks and the water is climbing higher and higher. This is right in front of my house where only some of the fill has been added since construction.

The crashing waves breached my 3 foot rock wall which a few weeks ago was about 15 feet away from the lake. That's a lot of water!
 My fire pit is buried now. I hope the water level peaks soon.


The crashing waves breached my 3 foot rock wall which a few weeks ago was about 15 feet away from the lake. That's a lot of water!

Friday, May 27, 2011
One a Day in May - Day 27 - Four Leaf Clover
This was a quick and simple card to make at the end of a very busy day but that's only because much of the work had already been done.

The paper, from my stash, is made from corn husks and recycled paper. I haven't started making new paper yet this spring. I spend a great deal of my time from late spring until early fall collecting plant fibres and then processing them to make my handmade paper. I especially enjoy sunny summer days when I can float around on my floaty chair on the lake while I strip plant fibre and then make the paper outdoors.
I made the four leaf clover print from one that I found on a large plant along with several others last summer. So this evening, all I had to do was put together the pieces for this card. And now I'm going to fall into bed.
Thursday, May 26, 2011
One a Day in May - Day 26 - Calendula card set
I made the paper for these cards last summer but first I dyed the corn husks and the recycled paper with dye that I made from Goldenrod blossoms. I love experimenting with wild flower dyes. Most of them dye some shade of yellow, but a wide range from orangey yellows to greenish yellows. And you can get even more variety by using different modifiers. I'll do a tutorial about dyeing with plants later this summer.
 My lighting washed the yellow out a bit in this photo but the Goldenrod gives the paper a light mustard yellow colour. The flowers on these cards are Calendula (Pot Marigold).

Wednesday, May 25, 2011
One a Day in May - Day 25 - More ACEOs
I've been staining boards for the siding on my house since I got home from work so I just managed to squeeze in two more ACEOs from the backgrounds I made yesterday.
It's silly, I know, but I seem to need sleep! It sure interferes with getting things done.
 |
| Secrets, ACEO |
 |
| Dragons, ACEO |
Tuesday, May 24, 2011
One a Day in May - Day 24 - Money Tree ACEO
Wow, do I ever lose track of time when I'm playing in my studio! I just noticed that it's 2 hours past my bedtime. Tonight I decided to play with the basket full of goodies that I received in my swap with the Melange Team on Etsy.
I started with a 9x12 sheet of watercolour paper and just started ripping and gluing down a pleasing assortment of papers, a few sparkles and some other shiny stuff. Then I covered the whole thing with satin gel medium. Once it was dry enough I cut it up into ACEO size (2 1/2 x 3 1/2 inches) with some bits left over for tags.
 Then I chose one of the pieces to develop further.
For this ACEO I made a tar gel transfer from a photocopy of a tree drawing which I adhered with more tar gel to the background. I added some 'fairy dust' sparkly stuff, little stickers of 'money', and text on a small piece of muslin. If only!
I started with a 9x12 sheet of watercolour paper and just started ripping and gluing down a pleasing assortment of papers, a few sparkles and some other shiny stuff. Then I covered the whole thing with satin gel medium. Once it was dry enough I cut it up into ACEO size (2 1/2 x 3 1/2 inches) with some bits left over for tags.

 |
| Money Tree, ACEO |
Monday, May 23, 2011
One a Day in May - Day 23 - Sunflower photo card
Every inch of my body hurts after a full day of heavy lifting and moving. I've given myself a deadline of June 4th to have everything in its place. Not the best time to have challenged myself to produce something every day!
I think the most important lesson I'm learning from this exercise so far is that even when time and energy are in short supply, just doing one small thing really adds up. Just to be able to pop a few new cards every week into my space at the Artisan Centre helps keep it fresh.
 At first I wasn't sure if I liked the way this sunflower photo turned out. The hand made plant fibre paper that I printed it on was pretty coarse so the image isn't sharp. But once I mounted it on the hand made gladiola paper card, I changed my mind. I think the added texture is rather interesting.
I think the most important lesson I'm learning from this exercise so far is that even when time and energy are in short supply, just doing one small thing really adds up. Just to be able to pop a few new cards every week into my space at the Artisan Centre helps keep it fresh.

Sunday, May 22, 2011
One a Day in May - Day 22 - Deer and cat card set
My studio is almost reorganized but it's taking way longer than I planned. Rethinking how much I can reasonably fit into a limited space is always a challenge. It's a generous space and I love it but I simply have too much stuff that I'm not willing to let go of.
I squeezed in this set of block printed note cards. The texture of the handmade paper adds rustic charm but it's almost impossible to get a perfect print.

I used two photos and my imagination to create this block print. One of the photos was of my daughter's cat sitting on a dresser looking out the window,

and the other was a photo of a deer in our yard. Not a great photo but I only needed the silhouette anyway.
 For Christmas cards I added a dab of red sparkly paint where the deer's nose would be.
I squeezed in this set of block printed note cards. The texture of the handmade paper adds rustic charm but it's almost impossible to get a perfect print.

I used two photos and my imagination to create this block print. One of the photos was of my daughter's cat sitting on a dresser looking out the window,

and the other was a photo of a deer in our yard. Not a great photo but I only needed the silhouette anyway.

Saturday, May 21, 2011
One a Day in May - Day 21 - Flower basket card
I can't believe I've made it this far into my personal challenge to produce at least one piece a day in May. There have been days, like today, that I feel too tired to do anything but have a bath and go to bed; but I made myself a promise (and then foolishly announced it to the world!) so here is today's challenge piece.
As soon as I finish a few more cards for my space at the Artisan Centre, I'm going to start working on replenishing my Etsy shop. One listing a day? Maybe.
 |
| Pressed flower assortment in birch bark 'basket' on gladiola leaf paper card. |
Friday, May 20, 2011
One a Day in May - Day 20 - Poppy photo card
I've spent the past 5 hours organizing in my studio and if I had completed the job I would have considered that my creative bit for the day. But there are still hours to go in there, so I did a pretty low stress photo card instead.
 The poppy photo is printed on paper made from recycled paper and mixed plant fibres and then coated with digital medium. It's mounted on hand made iris leaf paper.

Thursday, May 19, 2011
One a Day in May - Day 19 - Heart card
The heart on this card is made from alder twigs. They have to be bent into shape and pinned to dry for about a week before they are dry enough to hold their shape when glued to the card. I use fine wire at the joins. The closed dried blossom is birch leaf spirea.
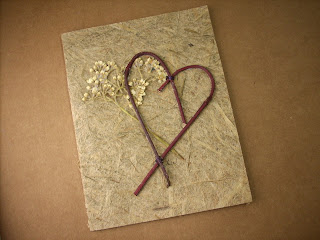 This card is made from pure swamp grass paper. I like the rough texture. I processed the plant fibres for a shorter time so they
didn't break down as much. Sometimes I want a smoother surface for my
cards, especially for printing photos onto, so I'll cook the plant
material for a longer time.
This card is made from pure swamp grass paper. I like the rough texture. I processed the plant fibres for a shorter time so they
didn't break down as much. Sometimes I want a smoother surface for my
cards, especially for printing photos onto, so I'll cook the plant
material for a longer time.

Wednesday, May 18, 2011
One a Day in May - Day 18 - Introspection
I missed most of this beautiful sunset this evening. I was working in my studio and looked up just as it was disappearing.

Maybe it's time to take a step back from production and just create because I love to, not because I'm obliged to. I already have a full time job. Should my art be another one? I want to make my home beautiful with all of the things I love to create but there aren't enough days in this lifetime if I keep filling them with never ending lists of "things I must make for money." And the reality is, the money never really adds up the way I hope it will. Not if I'm really honest about all the costs involved.
Obviously I'm having "one of those days." But it's something I'm going to spend some time thinking about.
Anyway, here's my Day 18...a set of small notecards to sell!

Tuesday, May 17, 2011
One a Day in May - Day 17 - Deja Vu Winter!
This was my morning commute! I stopped the car to take the picture but I was only going 30 kilometres per hour. The roads were treacherous! Since almost everyone has traded in their winter tires for their summer wheels it was a pretty hairy trip in to work today. Good thing I'm a procrastinator and still have on my winter tires!

We had 4 inches of snow by the time the day was over and the power was out most of the day.
 I completed 8 more moose poo cards this evening.

We had 4 inches of snow by the time the day was over and the power was out most of the day.

Monday, May 16, 2011
One a Day in May - Day 16 - Oooohhh....Aaaahhh
I got an exciting packet in the mail today full of all kinds of bits and baubles for mixed media from some of my friends on the Melange Team on Etsy. I think using materials that I don't have a preconceived idea of how they were intended to be used will be fun.


The weather today just begged me to go curl up under the covers with a good book when I got home from work, so I did.
 |
| Big change from yesterday! |
But I did manage to get one card done before heading to bed...again...with my book!
 |
| Moose poo paper card |
Sunday, May 15, 2011
One a Day in May - Day 15 - Dippity Doo Dah Day!
I know it's really Zippity but I dipped another 2 dozen candles today so it's a bad play on words. It was an absolutely gorgeous day so I did a ton of things outside after I got the candles dipped.

I took a break from my work today to just sit on the beach and enjoy the view and to reflect. The winter was long and changes in my own life made it feel longer and darker. But I am so thankful for days like this when I can feel the sun again.


I took a break from my work today to just sit on the beach and enjoy the view and to reflect. The winter was long and changes in my own life made it feel longer and darker. But I am so thankful for days like this when I can feel the sun again.

Saturday, May 14, 2011
One a Day in May - Day 14 - Raku
I had a great day today taking the first part of a two day raku pottery workshop. It involved 5 hours of driving to get there and back but it was worth it.
We were each given a bag of clay to make as many pieces as we wanted. I made two fairly big pieces. I can't show my vase yet cause I already had it wrapped up in towels and plastic before I remembered to get my camera from the car. But here is a small sunflower wall hanging (about 12 inches tall) that I did.

I still have lots of clay so if I have time I'll make some more small pieces and bisque fire them at home before the second day of the workshop later this month.
Friday, May 13, 2011
One a Day in May - Day 13 - More candles
I hand dipped another 20 pairs of beeswax candles today. Spring has finally arrived and so much is calling me so loudly outside. It's going to be more and more challenging to do something in my studio every day as the weather gets nicer.


How odd!
I posted Day 11 of my challenge, but it's disappeared. Blogger was down since yesterday evening and now it's back, but my Day 11 post is gone. Hmmmm.
One a Day in May - Day 12 - More Moose Poo Cards
I worked my shift at the Lakes Artisan Centre yesterday after my day job and completed several moose poo paper cards while I was there. I tried to post yesterday but Blogger was down.
 |
| Moose photos printed on handmade paper prepared with digital medium; mounted on moose poo paper cards. |
Thursday, May 12, 2011
One a Day in May - Day 11 - Planning
I was already in bed last night before I stopped long enough to do anything creative. The electrician hooked up the plug for my kiln yesterday so I did some planning in my sketchbook for some small projects.
To start with I'm going to create some pieces to compliment some of what
I already do - soap dishes for my handmade soaps and candle holders for
my pure beeswax candles. I don't have a wheel yet so I'll be hand
building all my pottery.
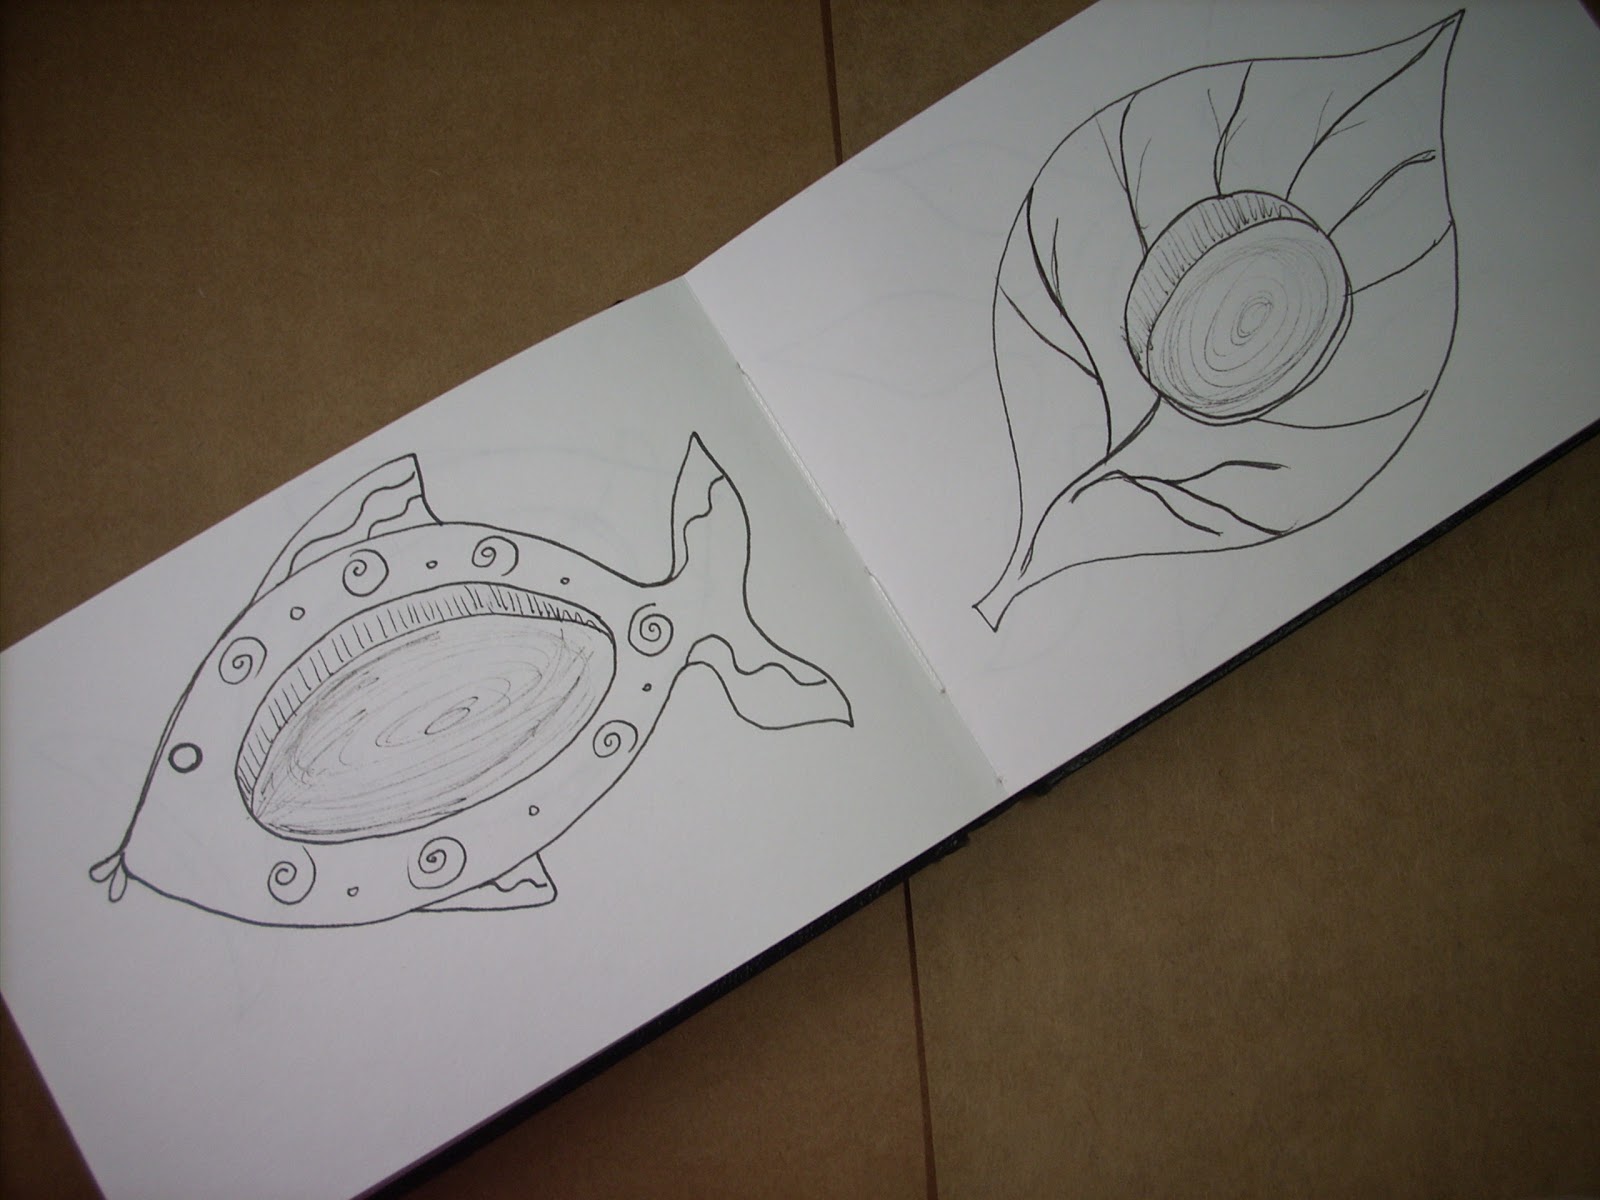 |
| Sketches for slab built soap dish and tea light candle holder. |
Tuesday, May 10, 2011
One a Day in May - Day 10 - Bleeding Heart Card
So much to do, so little time, but staying true to my challenge, here is today's small piece.

I printed a bleeding hearts photo onto vellum and then removed part of the ink with an alcohol wipe. I mounted the photo onto a copy of a handwritten poem and embellished it with tiny brads and a charm. The photo is then mounted onto a handmade iris leaf paper card.

I printed a bleeding hearts photo onto vellum and then removed part of the ink with an alcohol wipe. I mounted the photo onto a copy of a handwritten poem and embellished it with tiny brads and a charm. The photo is then mounted onto a handmade iris leaf paper card.
Monday, May 9, 2011
One a Day in May - Day 9 - Moose Poo Paper Card
It's coming into tourist season so I'm getting started on my moose poo card production. I made this card today using moose poo paper that I made last fall. My photograph of the moose is printed on hand made plant fibre paper coated with digital medium.
 My daughter-in-law gave me a box of moose poo for Mother's Day so I have
a good start. I found a few more deposits over the past few days that
I'll gather when I have some time on the weekend and then I'll get busy
making paper.
My daughter-in-law gave me a box of moose poo for Mother's Day so I have
a good start. I found a few more deposits over the past few days that
I'll gather when I have some time on the weekend and then I'll get busy
making paper.
If you're interested in the process of making paper from moose poo, look in the tutorials under Making handmade paper from plants.

If you're interested in the process of making paper from moose poo, look in the tutorials under Making handmade paper from plants.
One a Day in May - Day 8 - Hand Dipped Candles Tutorial
I had great plans for everything I was going to accomplish today,. Oh well, it was Mother's Day so I'll give myself a break. I did manage to hand dip a dozen pairs of beeswax candles at 26 dips a pair. Blogger isn't letting me download pictures tonight so I'll finish posting tomorrow.
It's not difficult to make hand dipped candles but it is somewhat tedious. Here's my method.
 I like to use pure beeswax for my hand dipped candles. It smells great, burns beautifully, and people who are sensitive to the smoke from paraffin don't seem to experience the same problems with beeswax candles.
Materials and supplies
A large pot to use as a water bath. Keep for candle dipping only.
Two cans to melt the wax in. Olive oil cans work well.
About 10 pounds of pure beeswax. You need extra to keep topping up the dipping can.
Flat braid wick. I use #12 normally but it depends on what I can get. The amount depends on how many pairs of candles you are dipping and the length which will be limited by the height of your dipping can. Calculate the length of two finished candles plus about 3 inches for the exposed wick. Cut to size. (I usually dip about a dozen pairs in a session).
A dowel (broom handle works) extended between two stations to hang the dipped candles between dips.
About 1/2 metre waxed butcher wrap or other non stick surface.

Method
1. Melt the wax in the two cans in the water bath. The dipping can should be filled almost to the top with melted wax. Just keep adding wax chunks as it melts to fill it. The second can will be used to keep melted wax to top up the dipping can.
2. Fold your length of wick over in the middle and grasp it lightly at the fold.
3. Dip into the melted wax, leaving the top exposed, as shown.

4. Carefully drape over the dowel. Continue with each pair of candles.
5. Repeat steps 3 and 4 for about 10 dips.
6. At this point, you will find that your candles are a little 'wonky' so I individually roll each pair back and forth gently on a non-stick surface to straighten them and I also trim off the bottoms that extend past the wick. If you don't do this then eventually they'll be too long to submerse completely in the wax in your can. After straightening each pair, hang them and do the next pair before going back to the beginning to start dipping again. I do this again after the 20th dip.

6. Continue steps 3 and 4 until candles are the desired thickness. I usually find that between 25 and 30 dips is a nice size and each pair weighs about 1/4 pound. You will still have lots of wax left when you're done that you can add to for the next session.
7. You will notice that the beeswax darkens as it cools. It's best to let candles cure for a couple of weeks before using them as they will burn longer.
Note: candles drip less if they are not exposed to a draft. You can also colour your wax with chips made especially for dying wax.
 |
| The beeswax smells heavenly! |

Materials and supplies
A large pot to use as a water bath. Keep for candle dipping only.
Two cans to melt the wax in. Olive oil cans work well.
About 10 pounds of pure beeswax. You need extra to keep topping up the dipping can.
Flat braid wick. I use #12 normally but it depends on what I can get. The amount depends on how many pairs of candles you are dipping and the length which will be limited by the height of your dipping can. Calculate the length of two finished candles plus about 3 inches for the exposed wick. Cut to size. (I usually dip about a dozen pairs in a session).
A dowel (broom handle works) extended between two stations to hang the dipped candles between dips.
About 1/2 metre waxed butcher wrap or other non stick surface.

Method
1. Melt the wax in the two cans in the water bath. The dipping can should be filled almost to the top with melted wax. Just keep adding wax chunks as it melts to fill it. The second can will be used to keep melted wax to top up the dipping can.
2. Fold your length of wick over in the middle and grasp it lightly at the fold.
3. Dip into the melted wax, leaving the top exposed, as shown.

4. Carefully drape over the dowel. Continue with each pair of candles.
5. Repeat steps 3 and 4 for about 10 dips.
6. At this point, you will find that your candles are a little 'wonky' so I individually roll each pair back and forth gently on a non-stick surface to straighten them and I also trim off the bottoms that extend past the wick. If you don't do this then eventually they'll be too long to submerse completely in the wax in your can. After straightening each pair, hang them and do the next pair before going back to the beginning to start dipping again. I do this again after the 20th dip.

6. Continue steps 3 and 4 until candles are the desired thickness. I usually find that between 25 and 30 dips is a nice size and each pair weighs about 1/4 pound. You will still have lots of wax left when you're done that you can add to for the next session.
7. You will notice that the beeswax darkens as it cools. It's best to let candles cure for a couple of weeks before using them as they will burn longer.
Note: candles drip less if they are not exposed to a draft. You can also colour your wax with chips made especially for dying wax.
Sunday, May 8, 2011
Happy Mothers Day!
My mom had a lot of interesting stories to tell and I almost missed hearing them. She passed away in 2007.
Two years before my mom died, before she was diagnosed with cancer, I started a scrapbook of my mom's life. I sat with her often to ask questions and she was so pleased that I wanted to hear her stories. Like so many kids, I was always busy with my own life and thought I would do this 'someday'. I came so close to losing that opportunity.
My mom told me about a childhood of poverty and hunger, but also about a loving family, first loves, hard work, dances, singing and poetry. She recounted the heartache and the hopes in leaving Finland to come to Canada and her life in a new country where she couldn't speak the language. She shared the joys and disappointments of her life. I learned so much more about the person who was my mom by listening to her stories.
When the time came to eulogize my mom, I was so thankful that I could share some of those stories about this amazing woman; about her courage, strength, talent and generosity, and her love.
 |
| This photo was taken of my mom, Sirkka, at Pender Harbour. |
My mom told me about a childhood of poverty and hunger, but also about a loving family, first loves, hard work, dances, singing and poetry. She recounted the heartache and the hopes in leaving Finland to come to Canada and her life in a new country where she couldn't speak the language. She shared the joys and disappointments of her life. I learned so much more about the person who was my mom by listening to her stories.
When the time came to eulogize my mom, I was so thankful that I could share some of those stories about this amazing woman; about her courage, strength, talent and generosity, and her love.
Saturday, May 7, 2011
One a Day in May - Day 7
I spent the whole day today making soap; 7 batches and I created some new blends, too.
I also created one heck of a mess and that's it for today's creativity! I'm wiped!

 |
| Soaps in molds. They'll spend the next 24 hours under layers of blankets. |

Friday, May 6, 2011
One a Day in May - Day 6 - Paper Bag Tutorial
Here's a little tutorial for a simple gift bag. I love making these in all sizes for gifts of jewelry, handmade soaps, candles, etc. You can embellish them with pressed flowers, photographs or art to make them extra special. I usually use my handmade papers but they are also a great way to use up your stash of decorative commercial papers.
 The sample shown here uses my handmade gladiola paper. I left the top deckle edge but you could also fold the edge down at the start to if you would rather have a sharp edge and also to add strength if you are putting something heavy into the gift bag.
 For your form, choose a scrap of board or other object the size of the bag you want to make.
Your piece of paper dimensions:
height - how tall you want the bag overall plus the depth of the base and the width of the fold if you are folding over the top edge
width - the total of the front, back and 2 sides plus about 1" overlap.
Adhesive - I like to use a glue stick but you can use any adhesive that will dry fairly quickly.
 Fold over the top edge if you are not leaving a deckle edge.
Wrap the paper around the form and glue it closed. It should extend past the form (the width of the base).
 Fold the bottom over 'gift wrap style', gluing each fold to the paper beneath. For an extra strong base, insert a piece of cardboard against the form before folding the paper in and glue the paper to the cardboard.
 While the bag is still on the form, embellish if desired.
 Remove the bag from the form.
 Pinch the edges together on each side and crease. This will leave a triangle at the base on each side.
 Fold the base over to the back at the top of the triangle and crease. The bag will lay flat (how flat depends on the bulk of the paper you use) for storing.
Now you can punch holes near the top of the bag if you wish, add brads for strength, and close with string or yarn. Or you can just leave as is, fill with tissue paper and add a gift.
Have fun!


Your piece of paper dimensions:
height - how tall you want the bag overall plus the depth of the base and the width of the fold if you are folding over the top edge
width - the total of the front, back and 2 sides plus about 1" overlap.
Adhesive - I like to use a glue stick but you can use any adhesive that will dry fairly quickly.

Wrap the paper around the form and glue it closed. It should extend past the form (the width of the base).


Now you can punch holes near the top of the bag if you wish, add brads for strength, and close with string or yarn. Or you can just leave as is, fill with tissue paper and add a gift.
Have fun!
Woohoo! I have my kiln!
My new kiln has arrived along with a scrumptious array of clay and glazes! I'm so excited but I have to wait until I can get an electrician to wire a new breaker and plug for it on my back porch. The other option is to get rid of my kitchen stove and use that one since I don't like to cook much anyway. But just in case, does anyone have a clue what cone I would fire a roast to?
 |
| Skutt Kiln KM818-3 - Digital! |
Thursday, May 5, 2011
One a Day in May - Day 5
I used to agonize over the design of every card I made, trying hard to make each one different from the last. But many years and many hundreds of cards later, I realized that at $7 or $8 a piece, each one did not have to be an original design. Okay, I realized it, but I still agonize. It's my nature!
 Pressed pansies and viola on handmade gladiola paper.

Wednesday, May 4, 2011
One a Day in May - Day 4
I had to push myself to produce something this evening. After working all day I succumbed to a nap and then I had a meeting to attend which is for a very cool project to market and sell the arts in our region (The Enterprising Artisans Project). Then I came home and submitted some photographs of my work for the power point presentation they are doing at trades fairs in the region to promote the project. And then there was 'Survivor!' So I really did have some excuses but I knew if I used them today, I would find new ones tomorrow and the next day and pretty soon this One a Day in May challenge of mine would go the way of my diets.
 Mixed media (acrylic, watercolour, ink) mounted on kraft cardstock card.

Subscribe to:
Posts (Atom)