Sharing my passion for handcrafted jewelry, paper making, and living a creative life.

Monday, January 9, 2023

It's 2023! Time to turn those Negatives into Positives!

I seem to be making a habit of posting in January and then that's where it ends. I won't even promise to post more this year but maybe I'll surprise myself! Happy New Year to everyone (anyone?) who checks in!

If you are hoping this post offers some sage advise about turning around your attitude this year...sorry. But if you have made a resolution to do something with all those old negatives that have been haunting you for years, I have come up with a cheap and effective way to archive them on your computer. (Yes, someone else may have thought of this already.) All you need is a camera and a lightbox and basic photo editing software. I use Photo Studio. For the lightbox you can use an inexpensive commercial lightbox like the one sold by Stampin' Up or you can make one with some simple materials. Just do a search online for instructions.

Place your negative on the lightbox.

Take a photograph of the negative. I used my Android phone. (This isn't a great photograph to begin with but it was hard finding one that didn't have pictures of people in it).


 Send the photo to your computer. I just emailed mine and then saved it to my computer.

Open the photo file with your photo editing software and choose the 'Negative' option which will turn the file from a negative into a positive.

Crop as needed. Make any necessary adjustments to colour and balance.

Save the new positive to your computer.

For slides, just take a photograph of the slide on your lightbox and send it to your computer. Adjust image as necessary before saving.


Sunday, December 12, 2021

Getting Ready for 2022

 I can’t believe it’s almost 2022! 

I am getting excited to spend more time in my tiny upstairs art nook playing with my accumulation of  fun supplies. As much as I love creating and selling my jewelry, I’m missing painting and drawing and exploring new art techniques. 

As I prepare my bullet journal for 2022, I’m working out plans to stay motivated and productive in both my jewelry and my art. Most of all, I want to keep it all fun and exciting!

I just spent the last few days re-organizing my art space so I thought I would share the results with you. It’s just a 5x8 ft alcove at the top of the stairs but despite the small size, I have managed to create a space for dozens of different art mediums.


This is my little art nook - view from the top of the stairs.

I love using old or handmade containers in my studio, especially if they come from friends and family. I bought this old walnut dental cabinet at a local antique store.

The shallow drawers in this dental unit are perfect for all kinds of supplies

This piece, made from old barn board, holds a lot of supplies and gives me some extra space on top to spread out.
More storage on the wall in front of my 30.  40” antique work table, a peg board system from IKEA. The table legs are on risers so an IKEA Alex drawer unit fits underneath to store all kinds of art papers and printing supplies. Canvases are also stored under the table.

I hope this has given you some ideas for your own art studio, particularly if your space is small, like mine.

Friday, February 26, 2021

Recycling Copper to Make Jewelry: is it worth it?

My answer to that question would be a resounding MAYBE! 

I thoroughly enjoy re-imagining pieces of junk into inspired pieces of wearable art. It also pleases me to repurpose what is already available rather than add to the depletion of our natural resources.

Bangles made from recycled plumbing pipe

My customers enjoy the back story that recycled materials create, and they also like contributing positively to the environment through their purchases.

I've been recycling copper into jewelry for the past 10 years and it has become such an integral part of my process that using purchased new copper would feel at odds with what my jewelry represents.

BUT, if saving money on materials was my only motivation for recycling copper, I probably wouldn't bother. Copper is relatively inexpensive to buy but my 'free' recycled copper costs me hours in labour that I rarely recover in the final price of my creations.

So, is recycling copper to make jewelry worth it to you?

If you want to try out recycling copper plumbing pipe, here is a free tutorial. Be sure to take all safety precautions recommended by the manufacturer of your tools. Wear a mask and safety glasses.

Cut the pipe to length with a pipe cutter, available at your local hardware store. Anneal with a torch. Quench.

Draw a guideline lengthwise with a marker.

Put the piece of pipe in a vise, horizontally.

Use a metal cutting wheel in a rotary tool (like a Dremel) and use oil to help keep the cutting wheel from overheating. I run it through some 3 in 1 oil each time I cut across the pipe. Grip the rotary tool firmly with both hands and run the cutting disk along the line you have marked, repeatedly, until it cuts through the copper. This can take awhile. Be careful of kickback, particularly as the wheel breaks through the copper. One one and half inch Dremel metal cutting disk (E-Z lock kind) lasts me through about three 8" lengths of pipe if I'm careful and lucky.


Remove pipe from vice and anneal and quench. Using pliers on both sides of cut, work the annealed pipe apart. Anneal and quench again if necessarily.  

Your next steps depend on how your sheet will be used.


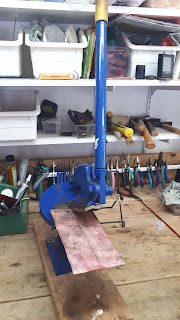
I use a throat shear purchased at an automotive supply shop (Princess Auto here in Canada) to cut my sheet into strips that will fit into my rolling mill. Don't try to cut too far along the strip at a time with the throat shear, otherwise it tends to curve. Annealing and quenching as needed, I roll out my cut pieces to the gauge I want and then cut those pieces to size with my throat shear.

Please excuse my crappy phone photos. I was taking the pictures as I worked through the process and I didn't have my good camera.

Wednesday, January 13, 2021

Hello 2021! Keep Smiling.

I join the rest of you in hoping that we soon see an end to COVID-19 and the havoc that it created in our world. When I made my plans and charted my goals for 2020, my chosen word for the year was 'Calm.' If I had only known what was ahead! My word for this year is 'Smile.' A reminder to myself to look back at each day and remember at least one moment that made me smile.

While 2020 had plenty of rabbit holes to go down, particularly on social media, I also had plenty of opportunities to celebrate life. This summer, I bought a little 10 ft pool to put in my postage stamp sized back yard so I could enjoy the peaceful feeling of drifting on water in my floaty chair whenever I felt like it. Some of my best ideas germinate in water.

We were lucky in our part of the world that we had low numbers of COVID during the summer months and could enjoy time with family outdoors. It made these recent months a bit easier to face.

I started my new year by getting my jewelry studio reorganized and refreshed. I feel like I'm starting a whole new journey in jewelry art since taking Susan Lenart Kazmer's online course, Intentional Metalsmithing. Her course has made me braver and I'm excited to see where that leads.


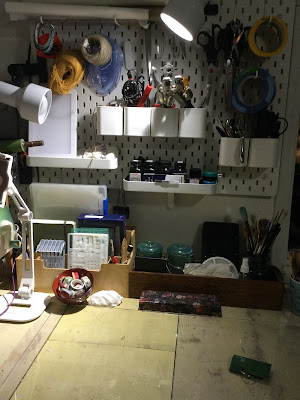
It's only 8x12 feet but it does the job. I do wonder what possessed me to paint the floor that colour when I work mainly in copper!  

This is a piece I made this winter while working on Intentional Metalsmithing.

I think pretty much every year I promise to do better at blogging and then the year passes and the only post I did was the one where I said I would do better at blogging this year. So we'll see. No promises.

Stay safe! Stay home. Wear a mask.


Monday, July 13, 2020

Do you want to be a jewelry artist?

I have to admit. I’m a bit of a jewelry snob. Creativity means much more to me than gold, diamonds and a hefty price tag.

That is why Susan Lenart Kazmer is one of my favourite jewelry artists. Her work is amazing! Last fall, I Jumped at the opportunity to sign up for Susan’s first 6 month Intentional Metalsmithing online jewelry course, a mentored program for beginning and advanced jewelry artists. There was no pressure to complete the course in the six month period as the videos continue to be available indefinitely. This worked well for me.

Susan is once again offering her mentored e-course, Intentional Metalsmithing. Susan teaches her techniques for creating exceptional artisan jewelry while encouraging and guiding participants to discover and use their own unique symbols and talismans in their designs.

Early bird pricing For the course ends tomorrow, July 14 but you can still sign up until July 16. The course starts on July 20. Even if you have never picked up a jewelry torch before, if you love creative jewelry, you’ll love this course!

100 Day Project - Day 2 - I quit!

As soon as I made the commitment to do this, I knew I didn’t really want to do it. One of the things that I love about retirement is having the freedom to wake up every day and decide how I want to spend the day. So why do I keep telling myself that I should do more or be more? I get done what I need to do. The rest is optional.

I was going to just delete the previous post and pretend this never happened😂 but I might as well own it.

Wednesday, April 8, 2020

100 Day Project - Day 1

Most of you have probably heard of The 100 Day Project #The100DayProject. You choose your own creative project to commit to for 100 days and post daily in the Facebook group.
Day 1 Getting ready
Retirement from my job away from home already meant I had lots of time to finally focus on my art and jewelry making. And now that social interaction has been restricted because of COVID-19, I have even more time. My problem has never been time, I realize now. I'm just a procrastinator.  There is always tomorrow, right?  But this pandemic is also teaching us that....maybe not.

So my 100 Day Project is to build a habit of spending time every day creating in my studio. No set times, just a commitment to do something. 100 Days to Build my Studio Habit.

Yesterday was Day 1 and I reorganized my jewelry studio to make my soldering area for jewelry more efficient.