Sharing my passion for handcrafted jewelry, paper making, and living a creative life.

Showing posts with label art jewelry. Show all posts

Friday, February 26, 2021

Recycling Copper to Make Jewelry: is it worth it?

My answer to that question would be a resounding MAYBE! 

I thoroughly enjoy re-imagining pieces of junk into inspired pieces of wearable art. It also pleases me to repurpose what is already available rather than add to the depletion of our natural resources.

Bangles made from recycled plumbing pipe

My customers enjoy the back story that recycled materials create, and they also like contributing positively to the environment through their purchases.

I've been recycling copper into jewelry for the past 10 years and it has become such an integral part of my process that using purchased new copper would feel at odds with what my jewelry represents.

BUT, if saving money on materials was my only motivation for recycling copper, I probably wouldn't bother. Copper is relatively inexpensive to buy but my 'free' recycled copper costs me hours in labour that I rarely recover in the final price of my creations.

So, is recycling copper to make jewelry worth it to you?

If you want to try out recycling copper plumbing pipe, here is a free tutorial. Be sure to take all safety precautions recommended by the manufacturer of your tools. Wear a mask and safety glasses.

Cut the pipe to length with a pipe cutter, available at your local hardware store. Anneal with a torch. Quench.

Draw a guideline lengthwise with a marker.

Put the piece of pipe in a vise, horizontally.

Use a metal cutting wheel in a rotary tool (like a Dremel) and use oil to help keep the cutting wheel from overheating. I run it through some 3 in 1 oil each time I cut across the pipe. Grip the rotary tool firmly with both hands and run the cutting disk along the line you have marked, repeatedly, until it cuts through the copper. This can take awhile. Be careful of kickback, particularly as the wheel breaks through the copper. One one and half inch Dremel metal cutting disk (E-Z lock kind) lasts me through about three 8" lengths of pipe if I'm careful and lucky.


Remove pipe from vice and anneal and quench. Using pliers on both sides of cut, work the annealed pipe apart. Anneal and quench again if necessarily.  

Your next steps depend on how your sheet will be used.


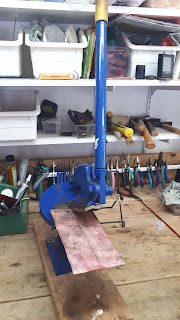
I use a throat shear purchased at an automotive supply shop (Princess Auto here in Canada) to cut my sheet into strips that will fit into my rolling mill. Don't try to cut too far along the strip at a time with the throat shear, otherwise it tends to curve. Annealing and quenching as needed, I roll out my cut pieces to the gauge I want and then cut those pieces to size with my throat shear.

Please excuse my crappy phone photos. I was taking the pictures as I worked through the process and I didn't have my good camera.

Tuesday, May 30, 2017

Cuttlefish Casting

I've been meaning to try casting with cuttlefish bone for some time and I finally got everything together so here is my first attempt. 


I used reclaimed sterling silver from a variety of sources after testing it first for silver content if it wasn't marked. 

I'm glad the first piece I did turned out because the next three didn't and I might have given up.  I learned from the flops, though, and as soon as I get some more cuttlebone I'll be at it again.  One of the things I learned is that the stench of burned cuttlefish bone doesn't leave the studio for hours!!! so next time I'll do this outside.

Sunday, March 16, 2014

More Patina Play on Copper

I'm trying to get into the habit of posting on my blog more regularly but life has a way of getting in the way and that's okay cause it's all good.  All I have to do is schedule myself a bit better.  Ha!!

I had a bit of time to play in my studio this weekend so I spent some of it playing with some more patina on copper penny earrings.  The first one, Liver of Sulphur, is pretty common.  I used the gel so all I had to do was stir it into some hot water (1 tsp of the Liver of Sulphur to 12 ounces of water).  I heated the copper a bit with the torch first so when I immersed the earrings in the solution, the colour developed very quickly and got quite black.  After rinsing and drying, I sanded the high points lightly for some contrast.
Copper earrings with Liver of Sulphur patina
On this next pair I decided to try layering a  couple of different techniques.  First I did a heat patina using peanut oil and the MAPP gas torch.  I lightly oiled the copper with peanut oil on a paper towel and then heated the earrings just until I got some colour variation - shades of brown and orange mostly.  Then I cleaned off the oil partially and spritzed the earrings with water, sprinkled with some salt, and left under a glass cake topper overnight with a small dish of ammonia.  This added some lovely turquoise blue colour to the mix.  Perfect compliment to the turquoise nuggets I added to these earrings.  If I had scrubbed more of the peanut oil off, I would have had more blue.  Maybe next time.  I love how they turned out anyway.
Copper earrings with peanut oil and MAPP gas patina topped with patina made with ammonia and salt
Jewelry making is so much fun!

Wednesday, February 19, 2014

Playing with Patina

I've been having fun playing in my studio with different patinas on copper.  These are the humble Canadian pennies that I start from.  They have to be 1996 or earlier (American pennies have to be 1982 and before).  The newer pennies don't contain enough copper and they just kind of explode into a molten mess when you heat them.
I found an awesome tutorial for making leaves in the Spring 2012 issue of Belle Armoire Jewelry.  Thanks, Lisa Weber!  Lisa's leaves were exquisitely done in silver but I have a copper budget and a few pennies that I have hoarded since the Canadian penny became obsolete.

I started by rolling the pennies flat in my rolling mill (a recent acquisition).  Then after a few more steps: annealing, quenching, folding, cutting, texturing, annealing, quenching, pickling, unfolding, filing, bending, sanding and cleaning, they were ready for the patina. And after making more than a dozen leaves, so was I! 
MAPP gas torch 
The flame from the MAPP gas torch is comparatively hot (hotter than propane or butane).  This lovely patina is just from waving the flame gently over the copper but not too long or you'll get fire scale. 
Peanut oil and MAPP gas torch
These ones are also done with the MAPP gas torch but first I coated the leaves with a thin coat of peanut oil using a paper towel.  They turn a lovely golden colour with a dark brown mottled effect.
Propane torch
Using the propane torch the same way as the MAPP gas torch, I got a little more variety in the colours.  I find that some of the lovely colours I get with either torch kind of disappear when I apply wax after the patina.
Ammonia and salt
This was my favourite patina.  I spritzed the copper with water and then sprinkled salt over the pieces.  Then I filled a small dish (about 1/4 cup) with household ammonia and set the earrings, right side up, beside the dish.  I then covered everything with a glass cake topper to keep the ammonia fumes contained next to the copper.  I left it overnight and the next morning I gently rinsed and wiped away the salt before waxing the earrings.
Novocan Black
For this pair I used Novocan black patina which is a chemical used on stained glass copper foil after soldering for a nice black finish.  I brushed some of the patina on the copper and, as it started to blacken, I sprinkled salt over it and got these lovely speckles.
Verdigris
This is the green colour one normally associates with aged copper.  This was the fiddliest patina so I plan to try a few other methods to see what will work the best.   For these earrings, I soaked a paper towel in vinegar and sprinkled it with salt.  I wrapped the earrings in the paper towels and set them under a small halogen lamp (about 6 inches away but be careful not to leave it unattended as the lamp can get really hot).  I left them for about 2 hours to get this green.  I gently wiped away the salt before applying the wax but I didn't rinse them as some earlier attempts had washed away the green patina. 
Oven-roasted
I did these ones in a toaster oven for 20 minutes at 350 degrees.  They turned kind of a golden brown with a hint of burgundy.  I think I'll try them in a slightly hotter oven next time...maybe a conventional oven.

I tried some other experiments that didn't give any noticeable results, such as lye, urea, and sodium bisulphate.  But I'll keep playing and share the results here....eventually.

I finished my pieces off with a coat or two of Renaissance Wax.  You can also use S100 which is a wax available at your local Harley dealer for polishing the metal on motorbikes.  It's a mix of carnauba wax and beeswax.