Sharing my passion for handcrafted jewelry, paper making, and living a creative life.

Monday, January 9, 2023

It's 2023! Time to turn those Negatives into Positives!

I seem to be making a habit of posting in January and then that's where it ends. I won't even promise to post more this year but maybe I'll surprise myself! Happy New Year to everyone (anyone?) who checks in!

If you are hoping this post offers some sage advise about turning around your attitude this year...sorry. But if you have made a resolution to do something with all those old negatives that have been haunting you for years, I have come up with a cheap and effective way to archive them on your computer. (Yes, someone else may have thought of this already.) All you need is a camera and a lightbox and basic photo editing software. I use Photo Studio. For the lightbox you can use an inexpensive commercial lightbox like the one sold by Stampin' Up or you can make one with some simple materials. Just do a search online for instructions.

Place your negative on the lightbox.

Take a photograph of the negative. I used my Android phone. (This isn't a great photograph to begin with but it was hard finding one that didn't have pictures of people in it).


 Send the photo to your computer. I just emailed mine and then saved it to my computer.

Open the photo file with your photo editing software and choose the 'Negative' option which will turn the file from a negative into a positive.

Crop as needed. Make any necessary adjustments to colour and balance.

Save the new positive to your computer.

For slides, just take a photograph of the slide on your lightbox and send it to your computer. Adjust image as necessary before saving.


Sunday, December 12, 2021

Getting Ready for 2022

 I can’t believe it’s almost 2022! 

I am getting excited to spend more time in my tiny upstairs art nook playing with my accumulation of  fun supplies. As much as I love creating and selling my jewelry, I’m missing painting and drawing and exploring new art techniques. 

As I prepare my bullet journal for 2022, I’m working out plans to stay motivated and productive in both my jewelry and my art. Most of all, I want to keep it all fun and exciting!

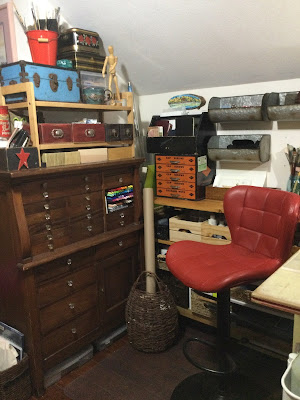
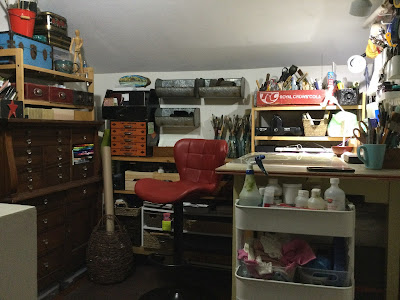
I just spent the last few days re-organizing my art space so I thought I would share the results with you. It’s just a 5x8 ft alcove at the top of the stairs but despite the small size, I have managed to create a space for dozens of different art mediums.


This is my little art nook - view from the top of the stairs.

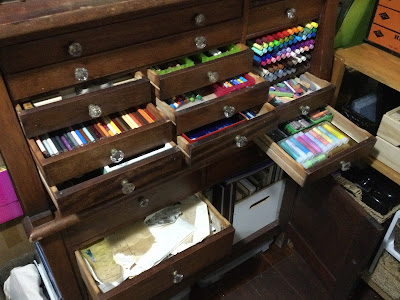
I love using old or handmade containers in my studio, especially if they come from friends and family. I bought this old walnut dental cabinet at a local antique store.

The shallow drawers in this dental unit are perfect for all kinds of supplies

This piece, made from old barn board, holds a lot of supplies and gives me some extra space on top to spread out.
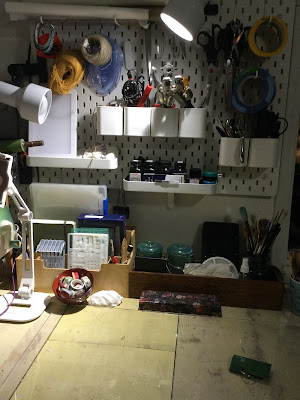
More storage on the wall in front of my 30.  40” antique work table, a peg board system from IKEA. The table legs are on risers so an IKEA Alex drawer unit fits underneath to store all kinds of art papers and printing supplies. Canvases are also stored under the table.

I hope this has given you some ideas for your own art studio, particularly if your space is small, like mine.

Friday, February 26, 2021

Recycling Copper to Make Jewelry: is it worth it?

My answer to that question would be a resounding MAYBE! 

I thoroughly enjoy re-imagining pieces of junk into inspired pieces of wearable art. It also pleases me to repurpose what is already available rather than add to the depletion of our natural resources.

Bangles made from recycled plumbing pipe

My customers enjoy the back story that recycled materials create, and they also like contributing positively to the environment through their purchases.

I've been recycling copper into jewelry for the past 10 years and it has become such an integral part of my process that using purchased new copper would feel at odds with what my jewelry represents.

BUT, if saving money on materials was my only motivation for recycling copper, I probably wouldn't bother. Copper is relatively inexpensive to buy but my 'free' recycled copper costs me hours in labour that I rarely recover in the final price of my creations.

So, is recycling copper to make jewelry worth it to you?

If you want to try out recycling copper plumbing pipe, here is a free tutorial. Be sure to take all safety precautions recommended by the manufacturer of your tools. Wear a mask and safety glasses.

Cut the pipe to length with a pipe cutter, available at your local hardware store. Anneal with a torch. Quench.

Draw a guideline lengthwise with a marker.

Put the piece of pipe in a vise, horizontally.

Use a metal cutting wheel in a rotary tool (like a Dremel) and use oil to help keep the cutting wheel from overheating. I run it through some 3 in 1 oil each time I cut across the pipe. Grip the rotary tool firmly with both hands and run the cutting disk along the line you have marked, repeatedly, until it cuts through the copper. This can take awhile. Be careful of kickback, particularly as the wheel breaks through the copper. One one and half inch Dremel metal cutting disk (E-Z lock kind) lasts me through about three 8" lengths of pipe if I'm careful and lucky.


Remove pipe from vice and anneal and quench. Using pliers on both sides of cut, work the annealed pipe apart. Anneal and quench again if necessarily.  

Your next steps depend on how your sheet will be used.


I use a throat shear purchased at an automotive supply shop (Princess Auto here in Canada) to cut my sheet into strips that will fit into my rolling mill. Don't try to cut too far along the strip at a time with the throat shear, otherwise it tends to curve. Annealing and quenching as needed, I roll out my cut pieces to the gauge I want and then cut those pieces to size with my throat shear.

Please excuse my crappy phone photos. I was taking the pictures as I worked through the process and I didn't have my good camera.

Wednesday, January 13, 2021

Hello 2021! Keep Smiling.

I join the rest of you in hoping that we soon see an end to COVID-19 and the havoc that it created in our world. When I made my plans and charted my goals for 2020, my chosen word for the year was 'Calm.' If I had only known what was ahead! My word for this year is 'Smile.' A reminder to myself to look back at each day and remember at least one moment that made me smile.

While 2020 had plenty of rabbit holes to go down, particularly on social media, I also had plenty of opportunities to celebrate life. This summer, I bought a little 10 ft pool to put in my postage stamp sized back yard so I could enjoy the peaceful feeling of drifting on water in my floaty chair whenever I felt like it. Some of my best ideas germinate in water.

We were lucky in our part of the world that we had low numbers of COVID during the summer months and could enjoy time with family outdoors. It made these recent months a bit easier to face.

I started my new year by getting my jewelry studio reorganized and refreshed. I feel like I'm starting a whole new journey in jewelry art since taking Susan Lenart Kazmer's online course, Intentional Metalsmithing. Her course has made me braver and I'm excited to see where that leads.


It's only 8x12 feet but it does the job. I do wonder what possessed me to paint the floor that colour when I work mainly in copper!  

This is a piece I made this winter while working on Intentional Metalsmithing.

I think pretty much every year I promise to do better at blogging and then the year passes and the only post I did was the one where I said I would do better at blogging this year. So we'll see. No promises.

Stay safe! Stay home. Wear a mask.


Monday, July 13, 2020

Do you want to be a jewelry artist?

I have to admit. I’m a bit of a jewelry snob. Creativity means much more to me than gold, diamonds and a hefty price tag.

That is why Susan Lenart Kazmer is one of my favourite jewelry artists. Her work is amazing! Last fall, I Jumped at the opportunity to sign up for Susan’s first 6 month Intentional Metalsmithing online jewelry course, a mentored program for beginning and advanced jewelry artists. There was no pressure to complete the course in the six month period as the videos continue to be available indefinitely. This worked well for me.

Susan is once again offering her mentored e-course, Intentional Metalsmithing. Susan teaches her techniques for creating exceptional artisan jewelry while encouraging and guiding participants to discover and use their own unique symbols and talismans in their designs.

Early bird pricing For the course ends tomorrow, July 14 but you can still sign up until July 16. The course starts on July 20. Even if you have never picked up a jewelry torch before, if you love creative jewelry, you’ll love this course!

100 Day Project - Day 2 - I quit!

As soon as I made the commitment to do this, I knew I didn’t really want to do it. One of the things that I love about retirement is having the freedom to wake up every day and decide how I want to spend the day. So why do I keep telling myself that I should do more or be more? I get done what I need to do. The rest is optional.

I was going to just delete the previous post and pretend this never happened😂 but I might as well own it.

Wednesday, April 8, 2020

100 Day Project - Day 1

Most of you have probably heard of The 100 Day Project #The100DayProject. You choose your own creative project to commit to for 100 days and post daily in the Facebook group.
Day 1 Getting ready
Retirement from my job away from home already meant I had lots of time to finally focus on my art and jewelry making. And now that social interaction has been restricted because of COVID-19, I have even more time. My problem has never been time, I realize now. I'm just a procrastinator.  There is always tomorrow, right?  But this pandemic is also teaching us that....maybe not.

So my 100 Day Project is to build a habit of spending time every day creating in my studio. No set times, just a commitment to do something. 100 Days to Build my Studio Habit.

Yesterday was Day 1 and I reorganized my jewelry studio to make my soldering area for jewelry more efficient. 

Friday, January 17, 2020

Happy 2020! May your foresight be as clear as your hindsight.

Another whole year has gone by without me keeping my word to blog more often. I also did a really lousy job of sticking to my Depth Year for 2019. And in the spirit of my goals for the new year, I don't care. It obviously wasn't my priority.

For 2020, my goal is to play more and make enjoying life a priority. If something doesn't give me pleasure, and it doesn't absolutely have to be done, then I'm not going do it. I am 65 years old and unless something miraculous happens, I don't have a whole lot of years left to waste doing things I don't want to do. Easier said than done, I know, but I'll try my best.

I've lived in this area for over 40 years but I only recently discovered this beautiful lake less than 10 minutes from my current home. There are so many more discoveries to be made.


On summer weekdays I am often the only person there so I can sit on the dock and paint or just drift on my floaty chair in beautiful peace and solitude.
Journal/sketchbook - enjoying the summer sunshine on my floaty chair
I look forward to more of this in 2020! How about you? Do you ever feel like time is running out and you would like to be doing more for your own well being? Try using Marie Kondo's technique for getting rid of clutter and ask yourself, "Does it spark joy?" If not, let it go!

Thursday, January 10, 2019

Depth Year 2019

“Go deeper, not wider.”  These are the words of David Cain at raptitude.com (Getting better at being human) in his first post about doing a "Depth Year." He talks about taking a year to go deeper with what you already own or know rather than acquiring more. Check out his blog for the complete post and be inspired!

Like many creatives, I have a habit of acquiring new and shiny supplies and resources when I already own more than I can possibly use in this lifetime. So I am declaring 2019, My Depth Year. My goals for the year are to not buy any new art supplies except to replace something that I have used up, to not buy any magazines or books and to go deeper to learn from what I already own, to not add any new art or crafts, and to not buy any new beautiful journals or art papers that call to me with their beautiful pristine pages and endless possibilities!

So far I have been successful for 10 days!

This is my little art area in an alcove at the top of the stairs. I had too much stuff for it all to fit in my little garden shed jewelry studio so I had to create a space for it in my house.


I love that everything is within easy reach. I'm excited to start going through my books and exploring neglected techniques and supplies.

Last January I took a free online boot camp called Jewelry Brand Makeover to help me figure out the direction I wanted to take my jewelry business. Flourish and Thrive Academy teaches jewelry designers and makers about growing a jewelry business. I went on to take their Laying the Foundation course, too. I learned a lot in both the free boot camp and the paid course and came away with so much information to use in my own business.


Now that I'm retired from my "day job", I am ready to explore further, to go deeper, in my jewelry business. I have so many decisions to make and I'm hoping to get the clarity I need by taking this year's boot camp called Jewelry Brand Marketing Hub as well as revisiting Laying the Foundation. If this is is something that interests you, here's the link http://www.flourishthriveacademy.com/makeover. I love how they are all about "Community Over Competition", jewelry designers helping their fellow jewelry designers.

Happy 2019 and cheers to you and meeting your goals for the year!


Monday, January 8, 2018

Happy New Year (finally)!

Hi everyone! Over a week into the new year but here I am finally. I've been giving this poor little blog disjointed starts for awhile now. This year I plan to change that. I even printed out some cool free Blog Post Planner sheets from a company called Productive Flourishing to keep me on track. They have lots of great planning tools on their website.

I haven't been very good about photographing my jewelry since I haven't been selling online but here are some pieces I did manage to get pictures of before the Christmas craft fairs this year. The leaves are made from old copper roof flashing that a friend found behind his shed. I annealed the copper and fold formed the leaves before using a blow torch to add several layers of enamel. The bails are made from obsolete Canadian copper pennies and I used recycled electrical wire for the jump rings and clasps.


I'm kind of excited to try some new strategies for growing my jewelry business and I'm starting by participating in a Jewelry Brand Makeover Boot camp. I've been a fan of Flourish and Thrive Academy for over a year now. I first discovered Tracy Matthews' podcasts while searching for something motivational to listen to while working in my studio. Flourish and Thrive Academy has a philosophy of Community over Competition and Tracy and her partner, Robin, share an incredible amount of free resources for jewelry designers at all levels. They also offer popular in depth courses for a fee. If you are a jewelry designer, you might want to check them out.

I'll see you again soon!


Tuesday, May 30, 2017

Cuttlefish Casting

I've been meaning to try casting with cuttlefish bone for some time and I finally got everything together so here is my first attempt. 


I used reclaimed sterling silver from a variety of sources after testing it first for silver content if it wasn't marked. 

I'm glad the first piece I did turned out because the next three didn't and I might have given up.  I learned from the flops, though, and as soon as I get some more cuttlebone I'll be at it again.  One of the things I learned is that the stench of burned cuttlefish bone doesn't leave the studio for hours!!! so next time I'll do this outside.

Monday, May 1, 2017

That didn't take long!

So over a year ago I moved from my lake into a little house in town. It was a really tough decision but it made sense in so many ways. I confess that I miss the lake a lot but I feel really good about the downsizing. 

When I moved I said I would be revamping my blog so I'm finally doing it. I hadn't been posting because I kept meaning to do this first. I'm trying colours that are different for me and getting away from the lake theme I had before I moved so this design is a work in progress.  We'll see how it develops.

My little house had no room for a studio and only a small space in the yard to build one. So, thinking it would save time and money, I bought a garden shed kit and converted it into a studio.  FYI, by the time I had the wiring, insulation, drywall, roofing, skirting, and replacing doors done as well as adding a small deck, I did not save time or money.   But it's done and I love it!  It's only one third the size of my lakeside studio (just 8' x 12') but it's cozy and efficient.  So come on in for a tour.  It won't take long!


View from the main door.

I'll try not to wait so long for my next post!

Monday, December 28, 2015

Goodbye Lakeside


As we look forward to retirement, it is time to start downsizing so we are leaving our home on the lake.


I have been so privileged to live right on the south shores of this beautiful pristine northern lake for so many years. 


Now it's time for change. 

Over the next few months I'm going to transition from the lakeside theme on this blog.  I don't want to change my blog location because then I would have to start over so I plan to do a bit of a renovation instead.  I don't know yet what that will look like but it will be more in keeping with Liz-Anna's Studio (no 'Lakeside').  Stay tuned.

Saturday, February 21, 2015

Etsy Again!

I received an email the other day from a Japanese TV Network (TV Asahi) that claims to be one of the biggest tv networks in Japan.  They are doing a program about the papermaking industry and want to include a bit about my moose poo paper, including photos from my blog.  I agreed but asked that they include a link to my Etsy shop in return.

Moose poo paper card from my Etsy shop
My Etsy shop, however, has been on vacation mode for several months.  So, once again, I'm responding to crisis and will be spending this week getting some listings back into my Etsy shop.

If you would like to learn more about the process behind making moose poo paper, check out my tutorial here. It includes links to the series.


Monday, December 29, 2014

Of Bees and Trees - The paintings

One last catch-up post because I said I would blog about my art show and then I didn't and 2014 is almost over. 

I had a show of my encaustic paintings, Of Bees and Trees, at the Smithers Art Gallery from Oct 28 - Nov 26 so much of the year was spent either painting or stressing about the paintings that I needed to get done.  It was kind of scary to put myself out there like that but I got lots of positive feedback and sold a few paintings, too.  Here are a few pieces from the show.

Sunflower, Good Morning, Encaustic, 24x24"
White Rose, Encaustic, 24x24"
Poppies I, Encaustic, 8x24"
Poppies II, Encaustic, 8x24"
Yellow Lily in Red Bowl, Encaustic, 24x24"
One with the Sun, Encaustic, 24x24"

Autumn Beauty, Encaustic, 8x24"

Now I am putting away my encaustic paints until next summer when I can work outside or in my studio with the door wide open.


Monday, October 13, 2014

Of Bees and Trees!

Two weeks until my show!  I will be having a showing of my encaustic paintings at the Smithers Art Gallery from October 28th through November 26th.  I'm nervous and excited!  I'll be sharing the gallery with feature artist, Leif Ostlund, a magnificent oil painter!  I'm looking forward to seeing his work in person.

My work will be shown in the part of the gallery known as the mini gallery.  It's in the main gallery room but it's a dedicated space that is a bit less intimidating to fill than the larger display area.  We'll be hanging the show on the 26th.  I have lots of new works ready for this show and now I'm working on some smaller pieces and some encaustic cards.  I'll share what I've been doing once the show has been hung and I can breathe again.

Opening night is Saturday, November 1st from 7-9 pm.